DacEasy Version 12
Getting Started With the Trial Version Readme
Contents
This document contains the following topics:
For more detailed information on using the Business Center, refer to the Online Getting Started Guide or Business Center Online Help.
System Requirements
The following system requirements are the recommended minimums for running DacEasy:
Note: For a list of optional requirements, refer to Chapter 3, "Installing DacEasy" in
the Online Getting Started Guide.
- Pentium® or equivalent microprocessor running at a minimum of 150 MHz, Pentium®
II or equivalent microprocessor at 300 MHz recommended
- 32 MB of free RAM minimum, 64 MB of free RAM recommended
- Windows® 95 B (OSR 2) or later, Windows 98 Second Edition, Windows NT® Server/Workstation
4.0 with Service Pack 5 or later, Windows 2000 Server/Professional or later,
Windows Me, Windows XP Professional or Netware 5.1 or later
Note: Windows 2000 Advanced Server and Windows Terminal Services are not
supported. Windows XP fast user switching is not supported.
- Mouse or compatible pointing device
- Hard disk drive with 55 MB of hard disk space available for a single module,
plus 25 MB for each additional module
- 4x CD-ROM drive
- VGA Display (256 or more colors) with at least 800 x 600 resolution, 1024
x 768 recommended (16 bit high color recommended for the Business Center)
- Microsoft® Internet Explorer 5.5 or later (included on V12 CD)
Note: Additional disk space is required if Microsoft® Internet Explorer
needs to be installed.
Return to top of page
Downloading and Installing the Trial Version
Downloading the Trial Version
- Access your Internet browser. Go to the following URL:
http://www.daceasy.com/daceasy/demo/download.asp.
- Click the selection you want to download.
- Type the User Name and Password provided in the email you received when
your registered for the trial version. Click Submit.
- Select to save the file when prompted. Navigate to a folder where you want
to save the file and click Save.
Installing the Trial Version
Once you have downloaded the trial version file, you are ready to run the Setup
routine to install the trial version.
- Using the Windows Explorer, navigate to the folder where you saved the file.
- Double-click the downloaded file. The Setup routine automatically begins when you double-click the downloaded file.
- Follow the instructions on your screen to install the files.
Note: We recommend you install the trial version into the default folder,
which is C:\DacEasy.
Return to top of page
Starting the Business Center and Opening the Sample Profile
- Click Start on the taskbar, then select Programs, then select DacEasy, and then select Business Center. The Welcome to DacEasy dialog box appears.
- Select Open Sample Profile.
- Type a User Name. You can type a Password but it is not required.
- Click OK to continue.
You can access the program for 30 days before you must purchase and register the program.
Note: If you decide to upgrade, you can convert your data after registering the program. Be sure to make a backup of your data before converting. After converting your data, you cannot convert your data back to a previous version.
Return to top of page
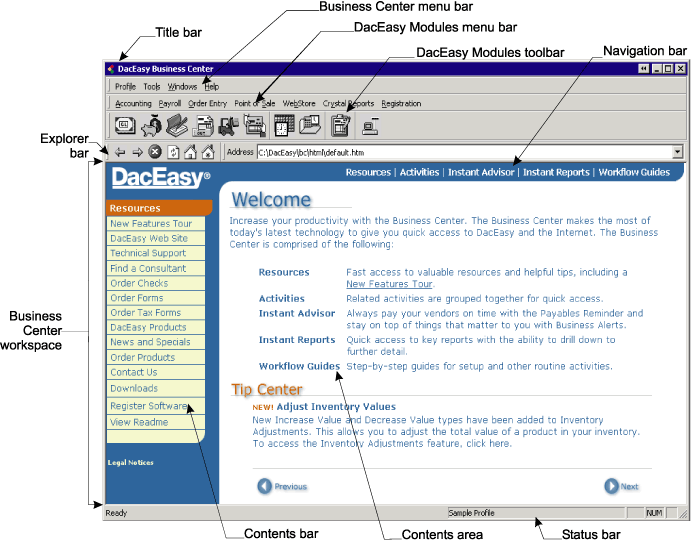
Understanding the Business Center
Use the image provided to identify the different areas of the Business Center. For more information
on the Business Center, refer to the chapter titled "Understanding the Business Center" in the Online
Getting Started Guide.
Return to top of page
Viewing the New Features Tour
A New Features Tour is included in the Version 12 DacEasy Business Center. Use the New Features Tour to
familiarize yourself with the many powerful features in our new version of DacEasy. Each new feature
is presented in an easy-to-follow format that includes a feature overview along with steps and
procedures. Once you are familiar with the feature, you can click the Take Me There button
to go directly to that feature.
To view the Tour, view the Resources page in the Business Center workspace. You can do this by
clicking Resources on the Navigation bar, or by clicking the Business Center Home
Page button on the Explorer bar. While viewing the Resources page, click New Features Tour
in the Contents bar.
Return to top of page
Using the Setup Workflow Guide
The Workflow Guides included in the Business Center workspace consist of step-by-step guides that
assist you in successfully completing certain DacEasy processes. These guides are especially useful
when completing involved processes such as setup or processes not performed as part of your regular
routine, such as closing the year.
The Setup Workflow Guide breaks down the setup process into phases. Each phase appears just below the
page title. When you click a phase, a list of each step in the phase appears. You can point to the
step to view a description. If the step applies, click the option to access the appropriate dialog box.
You do not have to complete the Setup Workflow Guide all at once. Once you click OK to save a record,
your company data is updated. You can stop and return at any time to complete the Setup using this Workflow
Guide. If you need to enter a transaction like an invoice right away, you can skip the Setup Workflow Guide
and add most of the information you need "on-the-fly" directly from the Invoice Entry screen.
To Use the Setup Workflow Guide
- Click Workflow Guides on the Navigation bar in the Business Center workspace. The Setup
Workflow Guide page appears in the Contents area.
- Click Company Setup, the first phase. The steps associated with setting up your company
preferences appear.
Click the step you want to complete. The appropriate dialog box appears. Complete
the dialog box, and then click OK to save your changes. Continue through
the list until all your company setup information is added.
Note: If at any time you need help when entering the Setup information,
click the Help button on the dialog box for a detailed description of
each field or the How do I button on the dialog box for more steps
on completing the procedure.
Note: If a plus appears on the bullet, the step applies to multiple DacEasy modules.
Click the step to view a list of applicable modules. Click a module and the appropriate dialog
box appears. After completing the step for each module, you can click the step to hide the
list of modules.
- Click Tables, which is the next phase. The steps associated with setting up table
information such as tax, terms and salespeople appear.
Click the step you want to complete. The appropriate dialog box appears. Complete
the dialog box, and then click OK to save your changes. Continue through
the list until all your table information is added.
- Click Defaults, which is the third phase. The steps associated with setting up default information
appear.
Click the step you want to complete. The appropriate dialog box appears. Complete
the dialog box, and then click OK to save your changes. Continue through
the list until all your default information is added.
- Click Add Records, which is the fourth and final phase. The steps associated with adding accounts,
vendors, customers, products, services, employees and the associated beginning balances appear.
Click the step you want to complete. The appropriate dialog box appears. Complete the dialog box,
and then click OK to save your changes. Continue through the list until you have added all
necessary information.
Return to top of page
Using the Activities Page to Create an Invoice
The Activities feature includes a collection of pages that organize related features,
regardless of the DacEasy module, into logical groupings. The links on the Activities pages
provide quick access to your data. With the click of a mouse you quickly access a feature in
DacEasy without using the menu or toolbar. For example, you can access the Inventory Activities
page to enter Promotional Prices in Point of Sale, view the Production Schedule in Order Entry or
use the Price Assignment feature in DacEasy Accounting.
To Create an Invoice Using the Activities Page
- Click Activities on the Navigation bar in the Business Center workspace. The Customer
Activities page appears in the Contents area.
- Click Invoicing. A list of activities related to the Billing module appears.
Note: If an activity appears dimmed, the module is either not installed or not included in
the company profile.
- Click Billing Invoices from the list of activities. The Invoice Entry dialog box appears.
Note: Each day a Registration message appears the first time you access a DacEasy module. You can access
the program for 30 days before you must purchase and register the program.
- Complete the Invoice Entry dialog box and click OK. The invoice is saved and the
dialog box is ready for another invoice.
Note: You can click LookUp to select an existing record from the following fields, Invoice Number,
Customer Code, Tax, Term, Via, Salesperson and Item Number. You can click Add to add a record
on-the-fly from the following fields, Customer Code, Tax, Term, Salesperson and Item Number.
Note: Click Help from anywhere on the Invoice Entry dialog box for a detailed description of
each field.
Return to top of page
Using the Instant Advisor
Use the Instant Advisor to stay in touch with your company data. The Instant Advisor consists of two separate routines, the Payables Reminder and the Business Alerts. Use these two routines to find out information
about your company's status quickly. To view the Instant Advisor, click Instant Advisor on
the Navigation bar in the Business Center workspace.
Payables Reminder
Use the Payables Reminder to keep up with the bills you pay. The Payables Reminder is
automatically set up to notify you of all invoices you have coming due. Then, you can use
the AutoPay feature if you are using DacEasy Accounting to pay your vendors with a few
clicks of a button. To view the Payables Reminder, click Instant Advisor on
the Navigation bar in the Business Center workspace, and then, click Payables Reminder in the
Contents bar. For more information on using the Payables Reminder, refer to the Business Center Online Help.
Business Alerts
Being in touch with your company's status and customers helps you make good business
decisions. Set up the Business Center to alert you when certain conditions are met. For example,
you can set up an alert so you are notified when the inventory level of an item reaches a
minimum. Once you get the alert, you know immediately you need to order more of that item from your
vendor. In addition to viewing the alert in the Instant Advisor, you can use the Business Center's
Instant Correspondence feature to send an e-mail to yourself or your staff so they are aware of the
alert. To view the Business Alerts, click Instant Advisor on the Navigation bar in the
Business Center workspace. For more information on setting up and using the Business Alerts,
refer to the Business Center Online Help.
Return to top of page
Viewing an Instant Report
Instant Reports provide quick access to key reports in the DacEasy modules. An additional benefit
is the ability to drill down on vital information to view the associated detail. For example, you can
view the Accounts Receivable Aging, and then drill down to the original transaction.
To View the Accounts Receivable Aging Instant Report
- Click Instant Reports on the Navigation bar in the Business Center workspace. The Accounting
Instant Reports page appears in the Contents area.
Tip: Point to a report name to view a description of the report with
a sample. You can click the sample report to enlarge the image, and then click
the Back button on the Explorer toolbar after viewing the sample to
return to the Instant Reports page.
- Click Accounts Receivable Aging from the list of Accounting reports. The Aging Summary report
appears.
Tip: Click the icon to the left of the report name to change the report criteria. A dialog box
appears with the available options for the report. Select the report options and click OK. The
Instant Report appears based on the criteria selected.
- Click the Customer Code or Customer Name to view the customer record on the Edit Customer dialog
box.
Click the AR Account Number to view the account record on the Edit Account dialog box.
Click any of the Amounts to view the Aging Detail report for that specific customer.
From the Aging Detail report, click the Invoice Number, Date, Due Date, Code or Amount to view
the original transaction.
Return to top of page